Overview of the graphical user interface
|
|---|
Figure 7: The KNIME workbench |
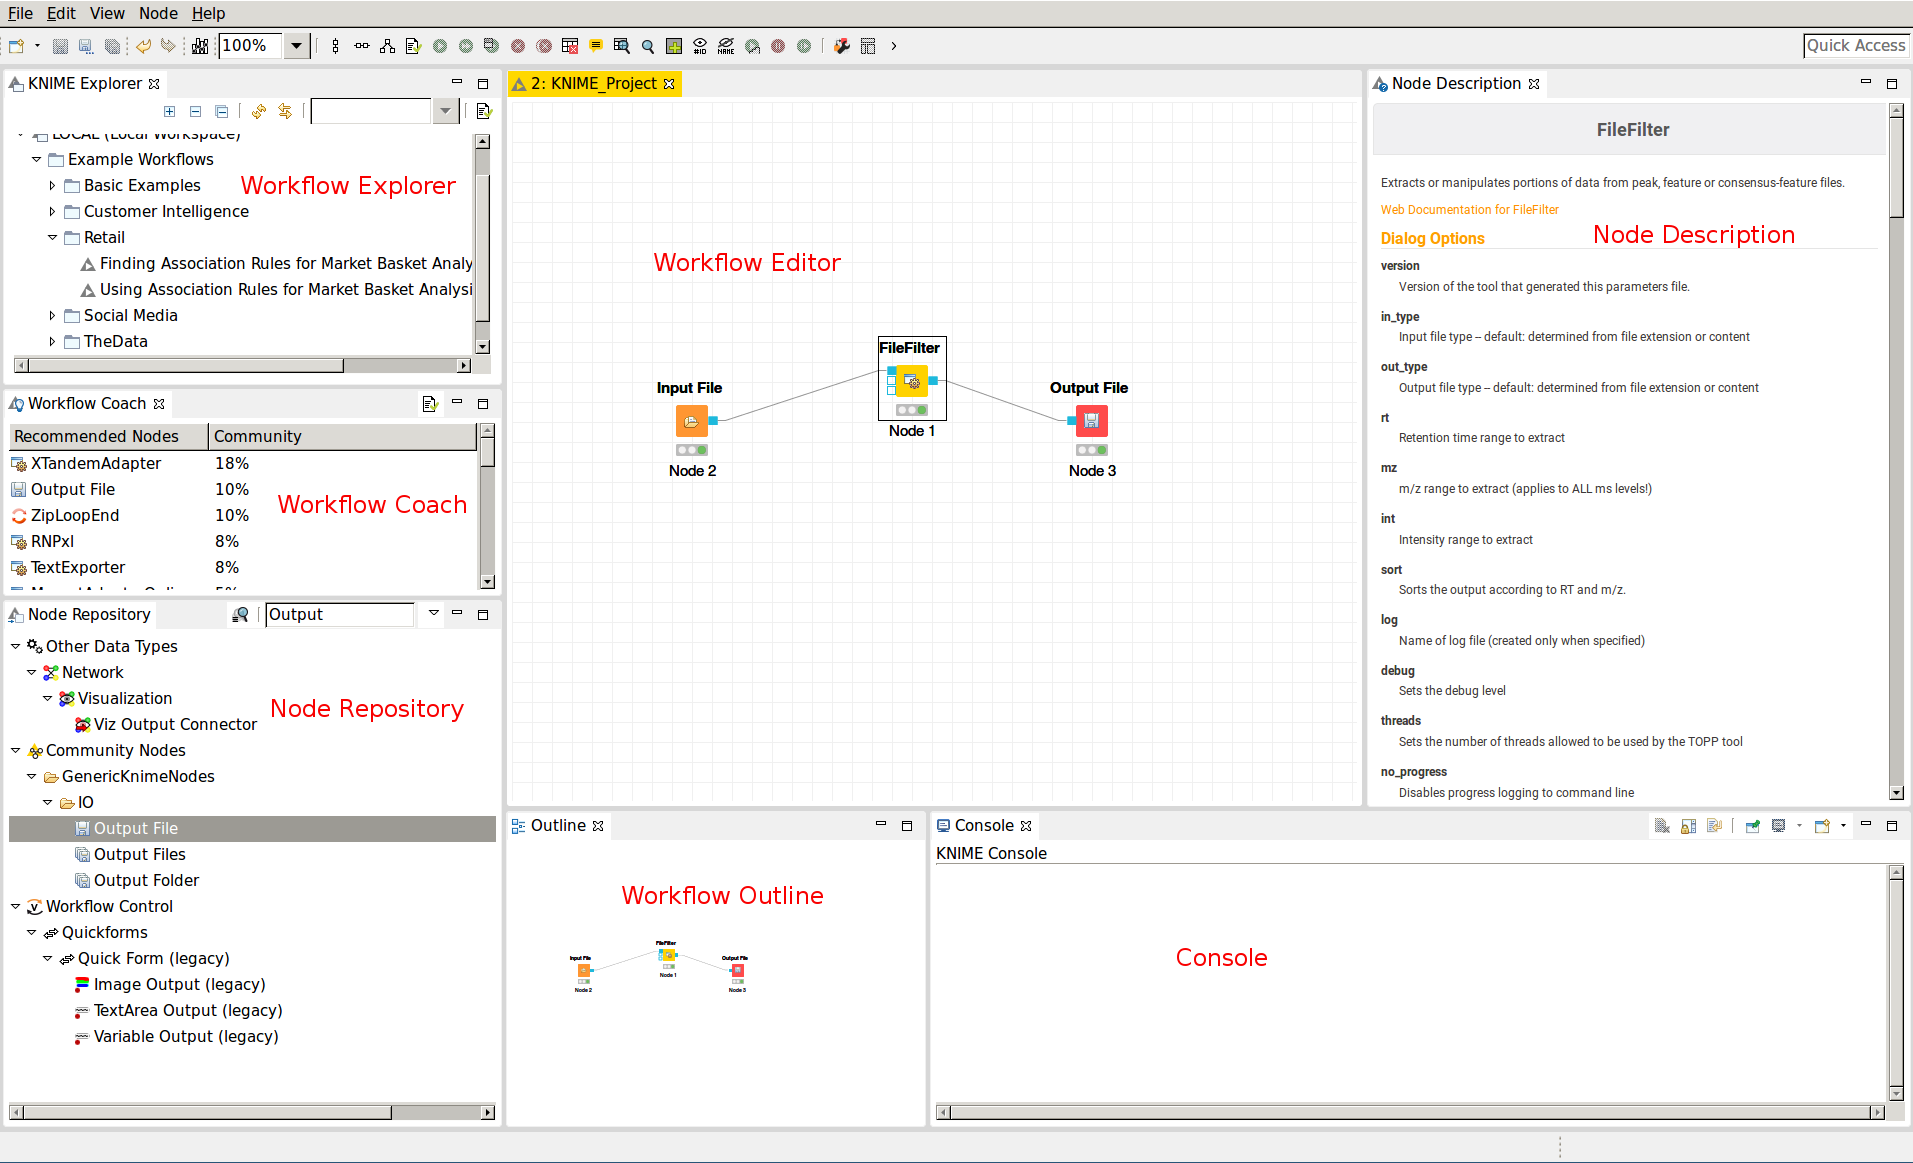
The graphical user interface (GUI) of KNIME consists of different components or so-called panels that are shown in above image. We will briefly introduce the individual panels and their purposes below.
Workflow Editor
The workflow editor is the central part of the KNIME GUI. Here you assemble the workflow by adding nodes from the Node Repository via ”drag & drop”. For quick creation of a workflow, note that double-clicking on a node in the repository automatically connects it to the selected node in the workbench (connecting all the inputs with as many fitting outputs of the last node). Manually, nodes can be connected by clicking on the output port of one node and dragging the edge until releasing the mouse at the desired input port of the next node. Deletions are possible by selecting nodes and/or edges and pressing DEL or Fn + Backspace depending on your OS and settings. Multiselection happens via dragging rectangles with the mouse or adding elements to the selection by clicking them while holding down Ctrl.
KNIME Explorer
Shows a list of available workflows (also called workflow projects). You can open a workflow by double-clicking it. A new workflow can be created with a right-click in the Workflow Explorer followed by choosing New KNIME Workflow from the appearing context menu. Remember to save your workflow often with the Ctrl + S shortcut.
Workflow Coach
Shows a list of suggested following nodes, based on the last added/clicked nodes. When you are not sure which node to choose next, you have a reasonable suggestion based on other users behavior there. Connect them to the last node with a double-click.
Node Repository
Shows all nodes that are available in your KNIME installation. Every plugin you install will provide new nodes that can be found here. The OpenMS nodes can be found in Community Node > OpenMS Nodes to hook up to external search engines and the RawFileConverter are found under Community Node > OpenMSThirdParty Nodes for managing files (e.g., Input Files or Output Folders) can be found in Community Nodes > GenericKnimeNode. You can search the node repository by typing the node name into the small text box in the upper part of the node repository.
Outline
The Outline panel contains a small overview of the complete workflow. While of limited use when working on a small workflow, this feature is very helpful as soon as the workflows get bigger. You can adjust the zoom level of the explorer by adjusting the percentage in the toolbar at the top of KNIME.
Console
In the console panel, warning and error messages are shown. This panel will provide helpful information if one of the nodes failed or shows a warning sign.
Node Description
As soon as a node is selected, the Node Description window will show the documentation of the node including documentation for all its parameters and especially their in- and outputs, such that you know what types of data nodes may produce or expect. For OpenMS nodes you will also find a link to the tool page of the online documentation.
Creating workflows
Workflows can easily be created by a right click in the Workflow Explorer followed by clicking on New KNIME workflow.
Duplicating workflows
In this tutorial, a lot of the workflows will be created based on the workflow from a previous task. To keep the intermediate workflows, we suggest you create copies of your workflows so you can see the progress. To create a copy of your workflow, save it, close it and follow the next steps.
Right click on the workflow you want to create a copy of in the Workflow Explorer and select Copy.
Right click again somewhere on the workflow explorer and select Paste.
This will create a workflow with same name as the one you copied with a (2) appended.
To distinguish them later on you can easily rename the workflows in the Workflow Explorer by right clicking on the workflow and selecting Rename.
Note
To rename a workflow it has to be closed.