Minimal Workflow
Let us start with the creation of a simple workflow. As a first step, we will gather some basic information about the data set before starting the actual development of a data analysis workflow. This minimal workflow can also be used to check if all requirements are met and that your system is compatible.
Create a new workflow.
Add an
File Importernode and anOutput Foldernode (found in Community Nodes > GenericKnimeNodes > IO) and aFileInfonode (to be found in the category Community Node > OpenMS > File Handling) to the workflow.Connect the File Importer node to the FileInfo node, and the first output port of the FileInfo node to the Output Folder node.
Tip
In case you are unsure about which node port to use, hovering the cursor over the port in question will display the port name and what kind of input it expects.
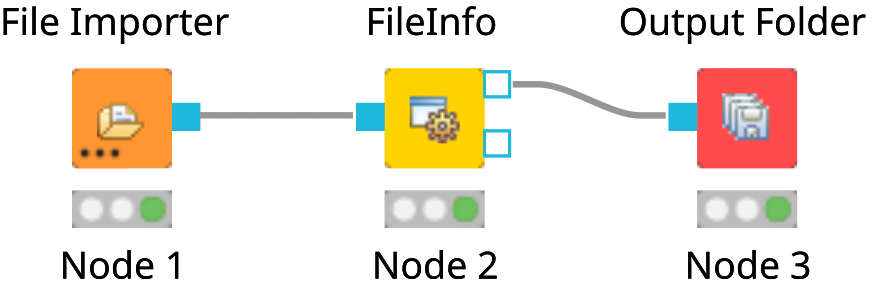
The complete workflow is shown in below image. FileInfo can produce two different kinds of output files.
|
|---|
Figure 8: A minimal workflow calling |
All nodes are still marked red, since we are missing an actual input file. Double-click the File Importer node and select Browse. In the file system browser select
Example_Data▸Introduction▸datasets▸tiny▸velos005614.mzML and click Open. Afterwards close the dialog by clicking Ok.The
File Importernode and theFileInfonode should now have switched to yellow, but theOutput Foldernode is still red. Double-click on theOutput Foldernode and click on Browse to select an output directory for the generated data.Great! Your first workflow is now ready to be run. Press ↑ + F7 (shift key + F7; or the button with multiple green triangles in the KNIME Toolbar) to execute the complete workflow. You can also right click on any node of your workflow and select Execute from the context menu.
The traffic lights tell you about the current status of all nodes in your workflow. Currently running tools show either a progress in percent or a moving blue bar, nodes waiting for data show the small word “queued”, and successfully executed ones become green. If something goes wrong (e.g., a tool crashes), the light will become red.
In order to inspect the results, you can just right-click the Output Folder node and select View: Open the output folder You can then open the text file and inspect its contents. You will find some basic information of the data contained in the mzML file, e.g., the total number of spectra and peaks, the RT and m/z range, and how many MS1 and MS2 spectra the file contains.
Workflows are typically constructed to process a large number of files automatically. As a simple example, consider you would like to filter multiple mzML files to only include MS1 spectra. We will now modify the workflow to compute the same information on three different files and then write the output files to a folder.
We start from the previous workflow.
First we need to replace our single input file with multiple files. Therefore we add the
Input Filesnode from the category Community Nodes > GenericKnimeNodes > IO.To select the files we double-click on the
Input Filesnode and click on Add. In the filesystem browser we select all three files from the directory Example_Data > Introduction > datasets > tiny. And close the dialog with Ok.We now add two more nodes: the
ZipLoopStartand theZipLoopEndnode from the category Community Nodes > *GenericKnimeNodes > Flow and replace theFileInfonode withFileFilterfrom Community Nodes > OpenMS > File Handling.Afterwards we connect the
Input Filesnode to the first port of theZipLoopStartnode, the first port of theZipLoopStartnode to the FileFilter node, the first output port of the FileFilter node to the first input port of theZipLoopEndnode, and the first output port of theZipLoopEndnode to theOutput Foldernode.
The complete workflow is shown in the top right of the figure below.
|
|---|
Figure 9: The FileFilter workflow. Showing the configure dialog for |
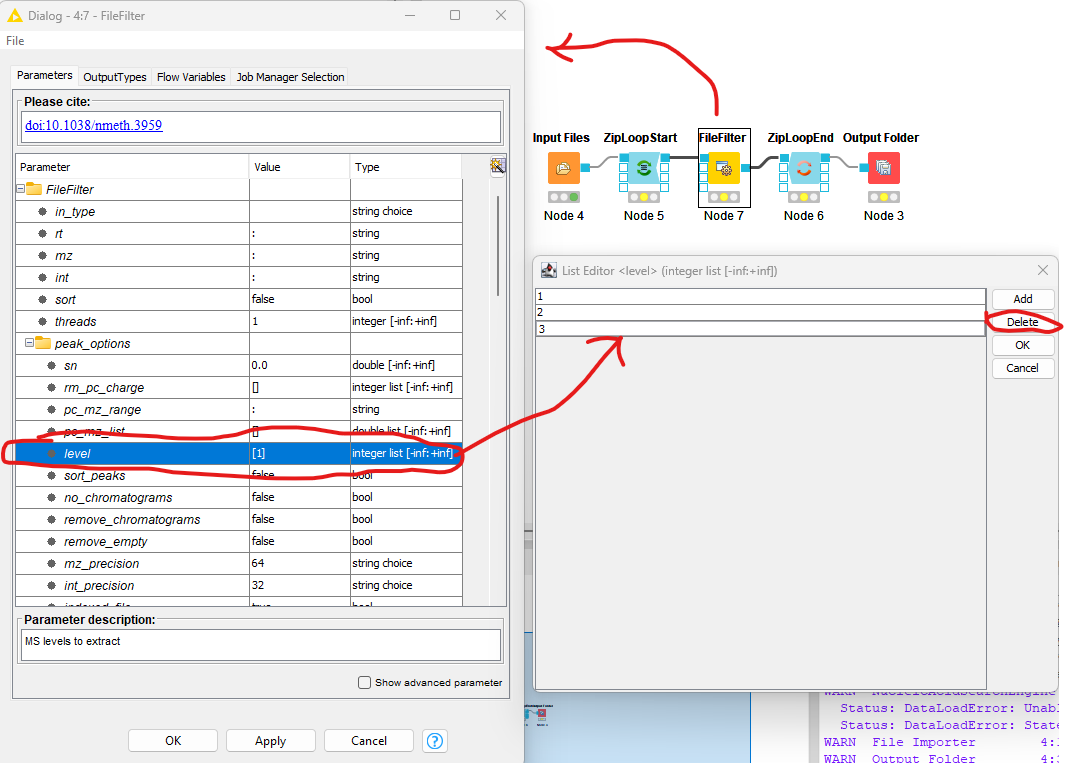
Now we need to configure the FileFilter to only store MS1 data. To do this we double click on the FileFilter node to open the configuration dialog (see left pane above), double click “level”, select 2
from the sub-pane (see bottom right panel above), and click delete. Repeat the process for 3. Select OK to exit the sub-pane, and then OK again in the configuration dialog.
Execute the workflow and inspect the output as before.
Now, if you open the resulting files in TOPPView, you can see that only the MS1 spectra remain.
In case you had trouble to understand what ZipLoopStart and ZipLoopEnd do, here is a brief explanation:
The
Input Filesnode passes a list of files to theZipLoopStartnode.The
ZipLoopStartnode takes the files as input, but passes the single files sequentially (that is: one after the other) to the next node.The
ZipLoopEndcollects the single files that arrive at its input port. After all files have been processed, the collected files are passed again as file list to the next node that follows.
Advanced topic: Metanodes
Workflows can get rather complex and may contain dozens or even hundreds of nodes. KNIME provides a simple way to improve handling and clarity of large workflows:
Metanodes allow to bundle several nodes into a single Metanode.
Task
Select multiple nodes (e.g. all nodes of the ZipLoop including the start and end node). To select a set of nodes, draw a rectangle around them with the left mouse button or hold Ctrl to add/remove single nodes from the selection.
Tip
There is a Select Scope option when you right-click a node in a loop, that does exactly that for you. Then, open the context menu (right-click on a node in the selection) and select Create Metanode. Enter a caption for the Metanode. The previously selected nodes are now contained in the Metanode. Double-clicking on the Metanode will display the contained nodes in a new tab window.
Task
Create the Metanode to let it behave like an encapsulated single node. First select the Metanode, open the context menu (right-click) and select Metanode > Convert to Component. The differences between Metanodes and components are marginal (Metanodes allow exposing user inputs, workflow variables and contained nodes). Therefore, we suggest to use standard Metanodes to clean up your workflow and cluster common subparts until you actually notice their limits.
Task
Undo the packaging. First select the Metanode/Component, open the context menu (right-click) and select Metanode/Component > Expand.