KNIME
Using OpenMS in combination with KNIME, you can create, edit, open, save, and run workflows that combine TOPP tools with the powerful data analysis capabilities of KNIME. Workflows can be created conveniently in a graphical user interface. The parameters of all involved tools can be edited within the application and are also saved as part of the workflow. Furthermore, KNIME interactively performs validity checks during the workflow editing process, to make it more difficult to create an invalid workflow. Throughout most parts of this tutorial, you will use KNIME to create and execute workflows. The first step is to become familiar with KNIME. Additional information on the basic usage of KNIME can be found on the KNIME Getting Started page. However, the most important concepts will also be reviewed in this tutorial.
General Remarks
This handout will guide you through an introductory tutorial for the OpenMS/TOPP software package[1].
OpenMS[2],[3] is a versatile open-source library for mass spectrometry data analysis. Based on this library, we offer a collection of command-line tools ready to be used by end users. These so-called TOPP tools (short for ”The OpenMS Pipeline”)[4] can be understood as small building blocks of arbitrarily complex data analysis workflows.
In order to facilitate workflow construction, OpenMS was integrated into KNIME[5], the Konstanz Information Miner, an open-source integration platform providing a powerful and flexible workflow system combined with advanced data analytics, visualization, and report capabilities. Raw MS data as well as the results of data processing using TOPP can be visualized using TOPPView[6].
This tutorial was designed for use in a hands-on tutorial session but can also be worked through at home using the online resources. You will become familiar with some of the basic functionalities of OpenMS/TOPP, TOPPView, as well as KNIME and learn how to use a selection of TOPP tools used in the tutorial workflows.
If you are attending the tutorial and received a USB stick, all sample data referenced in this tutorial can be found in the
C:▸Example_Data folder, on the USB stick, or released online on our Archive.
Getting Started
Installation
Before we get started, we will install OpenMS with its viewer TOPPView, KNIME and the OpenMS KNIME plugin. If you take part in a live training session you will have likely received an USB stick from us that contains the required data and software. If we provide laptops with the software you may of course skip the installation process and continue reading the next section. If you are doing this tutorial online, choose online in the following tab(s).
If you are working through this tutorial at home/online, proceed with the following steps:
Download and install OpenMS using the installation instructions for the OpenMS tools.
Note
To install the graphical application, please use the downloadable installer for your platform, not conda, nor docker.
Download and install KNIME
Please choose the directory that matches your operating system and execute the installer.
For Windows, you run:
Note
The OpenMS installer for windows now supports installing only for a single user. If you choose this option the location of the tools will be different than
The OpenMS installer:
Windows▸OpenMS-3.5.0-Win64.exe The KNIME installer:
Windows▸KNIME-5.5.0-Installer-64bit.exe
On macOS(x86), you run:
The OpenMS installer:
Mac▸OpenMS-3.5.0-macOS.dmg The KNIME installer:
Mac▸knime_5.5.0.app.macosx.cocoa.x86_64.dmg
On macOS(arm), you run:
The OpenMS installer:
Mac▸OpenMS-3.5.0-macOS.dmg The KNIME installer:
Mac▸knime_5.5.0.app.macosx.cocoa.aarch64.dmg
On Linux:
The OpenMS package:
Linux▸OpenMS-3.5.0-Debian-Linux-x86_64.deb can be installed with your package managerThe KNIME package can be extracted to a folder of your choice from
knime_5.5.0.linux.gtk.x86_64.tar
Note
You can also install OpenMS via your package manager (version availability not guaranteed) or build it on your own with our build instructions.
KNIME Modern and Classic UI
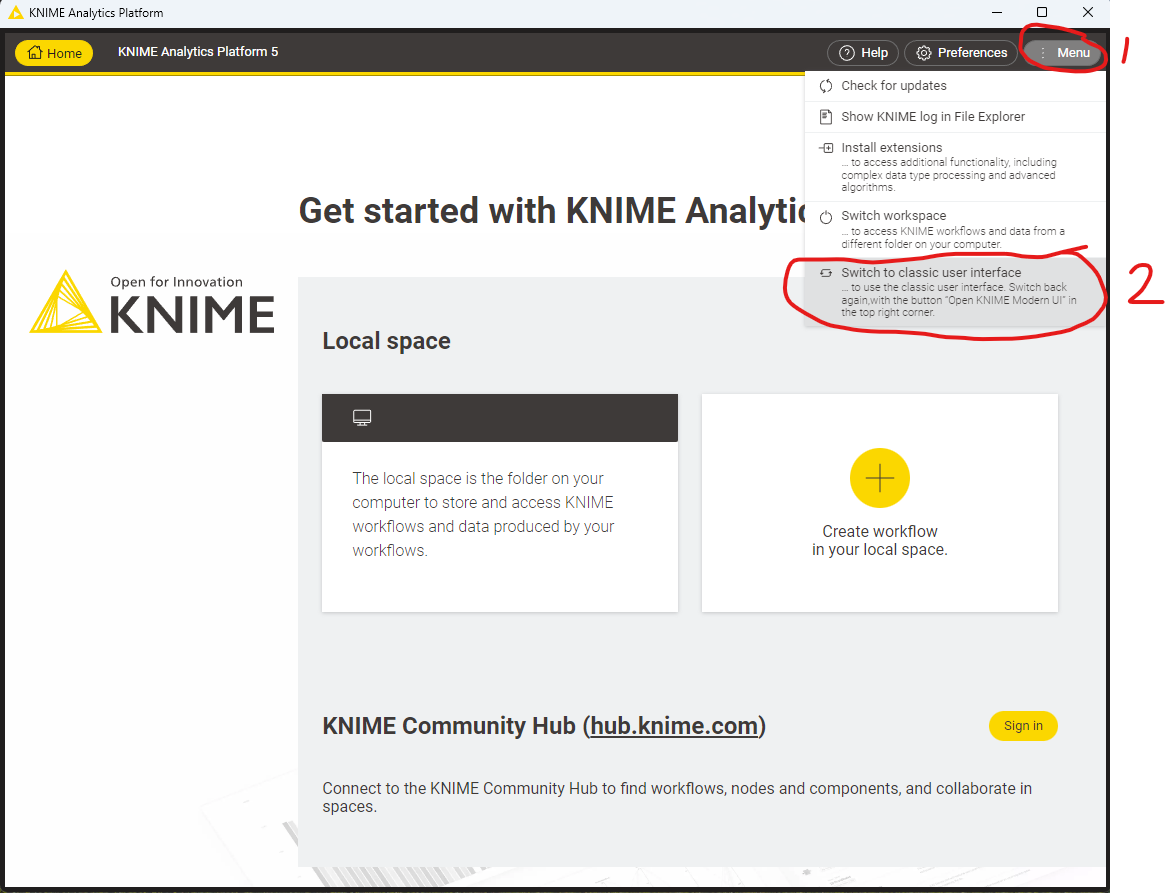
Since version 5.0 KNIME has a new updated user interface. For the purposes of this tutorial we will continue to use the “classic user interface”. Depending on your OS KNIME may have started automatically in the Modern UI, which looks like the following:
|
|---|
Figure 5.5: The modern KNIME UI. To switch back to the classic UI, select “Menu” and click “Switch to classic user interface” |
Plugin and dependency
Before we can start with the tutorial, we need to install all the required extensions for KNIME. Since KNIME 3.2.1, the program automatically detects missing plugins when you open a workflow but to make sure that the right source for the OpenMS plugin is chosen, please follow the instructions here.
Required KNIME plugins
First, we install some additional extensions that are required by our OpenMS nodes or used in the Tutorials for downstream processing, visualization or reporting.
In KNIME, click on Help > Install New Software.
From the ‘Work with:’ drop-down list, select the update site ‘KNIME 5.2 - https://update.knime.com/analytics-platform/5.2’
Now select the following KNIME core plugins from the KNIME & Extensions category
KNIME Base Chemistry Types & Nodes
KNIME Chemistry Add-Ons
KNIME Interactive R Statistics Integration
KNIME Report Designer
Click on Next and follow the instructions (it’s not necessary to restart KNIME now).
Click again on Help > Install New Software
From the ‘Work with:’ drop-down list, select the update site ‘KNIME Community Extensions (Trusted) - https://update.knime.com/community-contributions/trusted/5.2’
From the “KNIME Community Contributions - Cheminformatics” category select
RDKit Nodes Feature
From the “KNIME Community Extensions - Other” category select
Generic Worfkflow Nodes for KNIME
Click on Next and follow the instructions and after a restart of KNIME the dependencies will be installed.
R programming language and its KNIME integration
In addition, we need to install R for the statistical downstream analysis. Choose the directory that matches your
operating system, double-click the R installer and follow the instructions. We recommend to use the default settings
whenever possible. On macOS you also need to install XQuartz from the same directory.
Afterwards open your R installation. If you use Windows, you will find an ”R x64 4.3.2” icon on your desktop. If you use
macOS, you will find R in your Applications folder. In R, type the following lines (you might also copy them from the file
install.packages('Rserve',,"http://rforge.net/",type="source")
install.packages("Cairo")

install.packages("devtools")
install.packages("ggplot2")
install.packages("ggfortify")

if (!requireNamespace("BiocManager", quietly = TRUE))
  install.packages("BiocManager")

BiocManager::install()
BiocManager::install(c("MSstats"))
In KNIME, click on File > Preferences, select the category KNIME > R and set the ”Path to R Home” to your installation path. You can use the following settings, if you installed R as described above:
Windows:
C:\Program Files\R\R-4.3.2'macOS:
/Library/Frameworks/R.framework/Versions/4.3/Resources
KNIME OpenMS plugin
You are now ready to install the OpenMS nodes.
In KNIME, click on Help > Install New Software
You now have to choose an update site to install the OpenMS plugin from. Which update site to choose depends on if you received an USB stick in a hands-on Tutorial or if you are doing this Tutorial online.
To install the OpenMS KNIME plugin from the internet, do the following:
From the ‘Work with:’ drop-down list, select the update site ‘KNIME Community Extensions (Trusted) - https://update.knime.com/community-contributions/trusted/5.2’
Now select the following plugin from the “KNIME Community Contributions - Bioinformatics & NGS” category
OpenMS
OpenMSThirdParty
Click on Next and follow the instructions and after a restart of KNIME the OpenMS nodes will be available in the Node repository under “Community Nodes”.
Note
If this does not work for you, report it and while waiting for a reply/fix, try to use an update site of an older KNIME version by editing the KNIME version number in the URL or by using our inofficial update site at https://abibuilder.cs.uni-tuebingen.de/archive/openms/knime-plugin/updateSite/release/latest
We included a custom KNIME update site to install the OpenMS KNIME plugins from the USB stick. If you do not have a stick available, please see below.
In the now open dialog choose Add (in the upper right corner of the dialog) to define a new update site. In the opening dialog enter the following details.
Name: OpenMS 3.5.0 UpdateSite
Location:
file:/KNIMEUpdateSite/3.5.0/After pressing OK KNIME will show you all the contents of the added Update Site.
Note
From now on, you can use this repository for plugins in the Work with: drop-down list.
Select the OpenMS nodes in the ”Uncategorized” category and click Next.
Follow the instructions and after a restart of KNIME the OpenMS nodes will be available in the Node repository under “Community Nodes”.
To install the nightly/experimental version of the OpenMS KNIME plugin from the internet, do the following:
In the now open dialog, choose Add (in the upper right corner of the dialog) to define a new update site. In the opening dialog enter the following details.
Name: OpenMS 3.5.0 UpdateSite
Location: https://abibuilder.cs.uni-tuebingen.de/archive/openms/knime-plugin/updateSite/nightly/
After pressing OK KNIME will show you all the contents of the added Update Site.
Note
From now on, you can use this repository for plugins in the Work with: drop-drown list.
Select the OpenMS nodes in the “Uncategorized” category and click Next.
Follow the instructions and after a restart of KNIME the OpenMS nodes will be available in the Node repository under “Community Nodes”.